September 26, 2011

What's Up Wednesday...

NO, your calendar is not wrong....today is Monday, but I will be "leavin' on a jet plane" tomorrow to go back to Washington DC to cheer on the Vandals when they play University of Virgina next Saturday (trust me, they need a LOT of cheering), so I'm posting my "What's Up Wednesday" blog a couple days early! :0)

For the last two years I have been doing "Personal Yearbooks" with my two granddaughter's classes.  The idea comes from Becky Higgens, and she has passed the idea on through her blog.  From Becky:

Description

This is an ongoing project designed for students to complete themselves – no matter if they're in public, private, or home school. This will work with children as young as preschool and can even be used for older kids. The end result is a very basic month-by-month look at their journey and growth in a single school year.

Why?
I believe that teaching children to record their personal history is important and should be fun! Highlighting their own handwriting and art and pictures in a format like this can really boost a child's self-esteem. This isn't the type of project that ends up in the garbage. Volunteering to help kids complete this is a great way to get in the classroom with your child and serve your community.

Getting started

Introduce yourself to your child's teacher if they don't already know you. Volunteer to do this Personal Yearbook project with each of the kids in the class on a monthly basis.

Determine ahead of time if you are going to provide all the materials or if you're going to ask for a small donation from the parents to contribute to the project. It could be $2-3 per student, depending on how fancy-schmancy you want to get. I recommend keeping it simple and un-cluttered. (I kept it simple and the cost to me was very minimal.)

Together with the teacher, create a plan of each month's topic/theme/activity so that the "big picture" feels good to both of you. For example, you could focus on a big-deal activity each month (first day of school, holiday performance, Valentines exchange party). Or you could focus on routine activities that paint a picture of everyday life for the students (library, cafeteria, recess).

Gather all supplies based on how many students are in the class.
What you need

Time to pop into your child's class twice a month.

Camera

White cardstock for printing the pages (title page + 2 pages per month of school)

Adhesive (most kids will already have glue sticks at school)

Pen or pencil (if the kids don't already have this at school there's a problem)

Crayons, markers, colored pencils for drawing art (again, they should have this)

Variety of patterned paper (optional)

I have SO enjoyed getting to go into their classrooms every month and get to know the children and work with them on this project.  After teaching Kindergarten for 17 years, it's always a treat for me to get to go into a classroom and work with the children.  Having it be my granddaughter's classes makes it an extra bonus.

In September I took each child's picture, they made the covers for their books and did the September page:


Pin It!

September 22, 2011

What's Up Wednesday

Hey all, here's another look at what's new for you at Paper Pals for Autmn. Go in and check out the scrapping goodness!


Which of the three products on the video most interests you?
Enjoy!
Angela

(A big THANKS to Kristi Wildung, my amazing videographer. But keep your day job-- I like seeing you at the store!)
Pin It!

September 16, 2011

"Savor" Little Yellow Bicycle's Awesome Paper!

I wish I was better at making cards. I am not doing this paper justice! I love this paper, the way it tears and stretches and feels, it is almost like material, you can clip and curl and mangle and it holds up beautifully. You can do just about anything to it and the double sides never let you down. I had a lot of fun with this. I didn't even know what I liked about my Kitchen until I thought about it with this paper. What a great thing to record: What we do in, and love, about our kitchen! It was fun!


Pin It!

September 11, 2011

My Minds Eye Lost and Found TWO

I was so excited to see the color options for the new Lost and Found Two line... they had several options, but I knew this one was PERFECT for the photos I needed to scrap.When I was taking a photography class in the spring, I had my daughter pose for a great little photo shoot with her and knew I'd love to scrap some photos from the day. Isn't she just adorable?

 This second layout using the MME line features two photos in the same place but at different times. I'd like to make more pages by featuring "now and then" photos in them.
The chipboard pieces were great for the cards especially! These cards came together simply and turned out pretty cute.

Which of the color combos in the Lost and Found Two did you like best?
Pin It!

September 7, 2011

What's Up Wednesday - Are you a "Pinner?"

Are you a pinner? Do you pin? Do you know what I'm talking about? I'm talking about Pinterest! One of my very favorite websites. I get soooo much inspiration from this site, especially for scrapbooking. For those of you who don't pin, let me explain how it works. Or better yet, let me just quote their explanation from their site.

"Pinterest is a virtual pinboard. Pinterest allows you to organize and share all the beautiful things you find on the web. You can browse pinboards created by other people to discover new things and get inspiration from people who share your interests.
People use pinboards to plan their weddings, decorate their homes, and share their favorite recipes." - And so so so much more!

You can read in more detail about it here. In the meantime, let's take a tour around my Pinterest.

Here's the main page that came up when I logged in today. It shows you the latest pins from the people that you are following. Kinda like if you were following someone on twitter.

So, when you see something you like you repin it to your own board. If you find something on the web, from say your favorite blog, you use the "Pin It" button to pin it to your board, and add notes about the picture you are adding (i.e., love the flower technique used on this layout). You can even use the search feature on Pinterest to find ideas/pictures of what you are looking for.

The beauty of Pinterest is that it's versatile and super easy, and it's in one place so no matter where you're at you can access it as long as you have a computer or a smart phone.
Here's the toolbar where you can go to your own pins, boards, preferences, etc.


This is a snapshot of some of my boards. I have 24 right now categorized for different things. This is different for everyone. That's kinda the beauty of Pinterest. You can create a board for anything that interests you; hairstyles, clothing, shoes, gardening, scrapbooking, home decorating, cooking, etc.

Let's look at my "Organization" board. There are some great ideas in here huh?

When I click on one of my pins, it takes me to where I've entered notes and it gives me the website this idea is from. If it is a repoin it also shows who I repinned it from. Pretty cool huh?!

These are some pins inside my "Paper Crafting" board. (I just love Tara Orr! She's amazing! Plus, Paper Pals carries most of the lines she works with.)

Here are some from my "Projects for the Kiddos" board.

Did I mention it's FREE? Are you ready to sign up?  If you need an invite, send me your email address to ambermemcatcher at hotmail dot com and I'll hook you up!  I hear that otherwise you have to wait a couple weeks. If you are already on Pinterest follow me!

Happy pinning!
Pin It!

September 5, 2011

My Mind's Eye - Lost & Found Two - Portebello Road - Absolutely Fabulous!

My Mind's Eye is on a roll. You've seen other Design Team projects from the new lines that are fully stocked at Paper Pals, and now it is my turn to share. I had the opportunity to work with the Portebello Road line, a gorgeous combination of blues and browns. This paper is so versatile too! I chose to break a rule at the Cory house and use a photo of my son Spencer for Design Team layouts that will be at the store! You see, Spencer isn't fond of being "recognized" by his female friends and begged me not to use him as my subject matter anymore. Alas, this photo and this paper, beckoned me otherwise.

OK. This is a really straightforward set of goodies. On the layout, I followed three easy steps:
Step 1 - No matter what you think of the patterns in the paper line, trust the designer, and trust yourself! As you can see, I tried to do both in using the glittery green and blue diagonal print as accents to the "flowery" background paper.
Step 2 - layer, layer, layer...bits and pieces of the other papers (front and back sides) using strips and circles here and there
Step 3 - Embellish, embellish, embellish! I used a tiny Ali Edwards stamp, and goodies from the decorative brads that are part of this line. In addition, I inked the pom pom trim a darker shade of brown to coordinate with this background paper better. The trim looks fabulous with the papers that have more of the blue tones as well!

Next, I turned to my Card Ideas for Paper Crafters magazine (the current edition) for inspiration You can get one at the store...it is good! The Thank you card was inspired by "Several Circles Birthday (p. 49). The You Are So Special card was inspired by "Gradient Blues" on (p. 64), and the Gratitude card just came to me after perusing the magazine over and over. I share these examples so you can see how to take a basic concept and make it your own.


Finally, I turned to the scraps I had left and wanted to do something else with the adorable pom pom trim*. I just couldn't toss the remaining piece of the background paper either. You see, when making a layout with a large photo and mat, I usually cut out the background paper from behind it so I can use it in other smaller projects. This cute little photo holder provides a nice stand for the little dresser decor item I made for my daughter to remind her of her long-standing friendship with her BFF. The girls are 12 now, the photo was taken at Camryn's 7th B-day party, and they have been friends since they were 4 years old!

There you have it... choose a line, trust the designer, and go for it!

Enjoy!
Anita

* I also think the pom pom trim would be a great embellishment to a lampshade, pillow, or curtain! Think outside the box!
Pin It!

My Mind's Eye - Lost & Found Two - Portebello Road - Absolutely Fabulous new products!

My Mind's Eye is on a roll. You've seen other Design Team projects from the new lines that are fully stocked at Paper Pals, and now it is my turn to share. I had the opportunity to work with the Portebello Road line, a gorgeous combination of blues and browns. This paper is so versatile too! I chose to break a rule at the Cory house and use a photo of my son Spencer for Design Team layouts that will be at the store! You see, Spencer isn't fond of being "recognized" by his female friends and begged me not to use him as my subject matter anymore. Alas, this photo and this paper, beckoned me otherwise.
Step 2 - layer, layer, layer...bits and pieces of the other papers (front and back sides) using strips and circles here and there
Step 3 - Embellish, embellish, embellish! I used a tiny Ali Edwards stamp, and goodies from the decorative brads that are part of this line. In addition, I inked the pom pom trim a darker shade of brown to coordinate with this background paper better. The trim looks fabulous with the papers that have more of the blue tones as well!
Next, I turned to my Card Ideas for Paper Crafters magazine for inspiration You can get one at the store...it is good! The Thank you card was inspired by "Several Circles Birthday (p. 49). The You Are So Special card was inspired by "Gradient Blues" on (p. 64), and the Gratitude card just came to me after perusing the magazine over and over. I share these examples so you can see how to take a basic concept and make it your own.


Finally, I turned to the scraps I had left and do something else with the adorable pom pom trim*. I just couldn't toss the remaining piece of the background paper. You see, when making a layout with a large photo and mat, I usually cut out the background paper from behind it so I can use it in other smaller projects. This cute little photo holder provides a nice stand for the little dresser decor item I made for my daughter to remind her of her long-standing friendship with her BFF. The girls are 12 now and have been friends since they were 4 years old!

There you have it... choose a line, trust the designer, and go for it!

Enjoy!
Anita

* I also think the pom pom trim would be a great embellishment to a lampshade, pillow, or curtain! Think outside the box!

Pin It!

September 1, 2011

What’s Up Wednesday has turned into Trying to Think of Something Thursday…


…and then it came to me when talking to a friend. You see, I am really a trash to treasure, or recycle/reuse, “I can make something else with this” sort of gal. I also have a high need to store all of my crafting supplies and goodies in a space efficient manner.

I’ve collected a few very useful pieces of the modular paper crafting storage pieces by Making Memories. The only thing I didn’t love about them is that they are white. My entire house has knotty pine, hardwood floors, black or brown accents, and white just really isn’t much a part of the color scheme.

Then it hit me. A can of spray paint could change everything! I used two coats of a high gloss chocolate brown and now these pieces add wonderfully to the décor of our family room (and my scrapbooking nook within it).


This isn’t exactly paper-crafting expertise, but when you have great storage and organizational pieces that create a alluring space in which you can create, you can get back to work on your favorite projects with ease!
Pin It!

August 27, 2011

My Mind's Eye-"Mischievous" Halloween collection


"My Mind's Eye" has done it again with their new Halloween collection "Mischievous!"  Cute, double-sided cardstocks with lots of accessories to match!

Pair these papers up with Bazzill cardstocks (that just happen to match perfectly), buttons, ribbons, and other fun embellishments and you will LOVE scrapbooking some new layouts with your Halloween pictures.
Pin It!

August 22, 2011

My Mind's Eye- 12 days of Christmas

 I love Christmas so I was very excited to work with this fun cheerful paper.  It is My Mind's Eye 12 days of Christmas: Tinsel, Joy and It's the Season pattern paper along with the accessory sheet and 12 days of Christmas trim.  I love the trim with the little fuzzy pom poms.  I also used up a bunch of baker's twine. 
 I did a lot of punching and pasting on this page.  For the ribbon I ran it through the sewing machine on a basting stitch and then bunched it up and tacked it down with glue strips. 
There are so many accessories on the sheet that you could make at least 12 cards.  It was so hard to choose.  I wanted to use them all.  I added some pearl dots in silver to the tree. 
Pin It!

August 21, 2011

Lost & Found Christmas by My Mind's Eye

I got to work with one of the fabulous new lines by My Mind's Eye; Lost & Found Christmas. This paper is gorgeous! I don't usually enjoy scrapbooking Christmas (I know, I'm crazy), but this line makes it easy and really inspired me. I have four projects to share.

The first one is this layout.

I made two types of flowers; paper flowers (good tutorial here) and embossed ribbon flowers.  For the ribbon flowers I used a product called Ribbon Stiff (now being carried by Paper Pals). You paint it onto ribbon, let it dry, then you can punch your ribbon, cut it into any shape without fraying, and even use it in your die cutting machine or Cricut. I cut these out with my Cricut then used an embossing folder to emboss a polkadot design into them. *Note: I saw that Karen is offering a closs on different flowers. Check it out here.


My next project is this little matchbook type mini album. It's so simple and fun to make!

I also made two cards. This first one is a simple greeting card.

This next card was designed to hold a gift card inside.


There you have it! Now go check out the new products that have arrived at Paper Pals. You're gonna love them!
Pin It!

August 10, 2011

What's Up Wednesday!

Another video featuring some of my favorite new products in store! Enjoy.
Angela
Pin It!

August 5, 2011

New Design Team!

We've got a new design team underway at Paper Pals!

Several ladies have remained a part of the team from the last term, but we're happy to introduce to you a couple of fresh faces.

First off, we welcome Amber Anderson. She's new to our team and you can see her first project posted here. Welcome, Amber! We can't wait to see more of your projects.

We are also welcoming back Anita to the team. She took a break from the team to finish her PhD and now Dr. Cory is back to create and share with us. Welcome back, Anita!

Those remaining on the team are Judy Pilcher, Leah Larson, Deb Felsted and me (Angela Lenssen). We are excited to get going on some new projects to share what Paper Pals has to offer. Come back soon for even MORE!
Pin It!

August 3, 2011

What's Up Wednesday....

Some of my favorite things to pull out of my scrapbooking/card making "bag of tricks" are different fonts.  I LOVE FONTS!!  And, I think you can really enhance a card or scrapbook layout by choosing just the right font. 

I have purchased fonts from "Two Peas In A Bucket" and from "Scrap-n-fonts".  But, you don't have to spend a cent to get FANTASTIC fonts....there are SO many great sites on the Internet that offer hundreds and hundreds of FREE fonts!

I want to share with you some sites that I go to frequently to download some terrific fonts...and, all for free!!

1001 Free Fonts, http://www.1001freefonts.com/

dafont.com, http://www.dafont.com/

urban fonts, http://www.urbanfonts.com/free-fonts.htm

Font Garden, http://www.fontgarden.com/gallery.php

Free scrapbooking fonts, http://www.kevinandamanda.com/fonts/freescrapbookfonts/

Scrap Village, http://www.scrapvillage.com/fonts.htm

To INSTALL a font:

1.  Open Fonts by clicking the Start button , clicking Control Panel, clicking Appearance and Personalization, and then clicking Fonts.

2.  Click File, and then click Install New Font.  If you don’t see the File menu, press ALT.

3.  In the Add Fonts dialog box, under Drives, click the drive where the font that you want to install is located.

4.  Under Folders, double-click the folder containing the fonts that you want to add.

5.  Under List of fonts, click the font that you want to add, and then click Install.

(**If the font is in a zip file, you will have to "unzip" it: Right click on the folder and choose extract feature / option. Then you are ready to begin the download procedure.).


It's just that easy!!  I hope you will go out there and find and download some new fonts that you would like to try!  But, let me warn you...it is addicting!! :0)
Pin It!

July 31, 2011

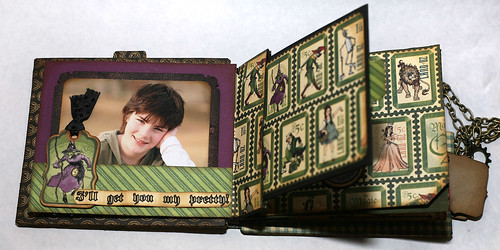
Magic of Oz Mini Album

Hello everyone! Amber here. This is my first project as a Paper Pals design team member. I hope you all enjoy it as much as I enjoyed creating it.

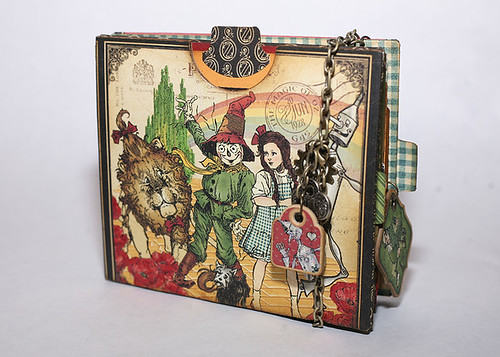
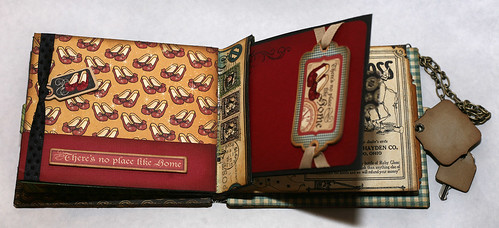
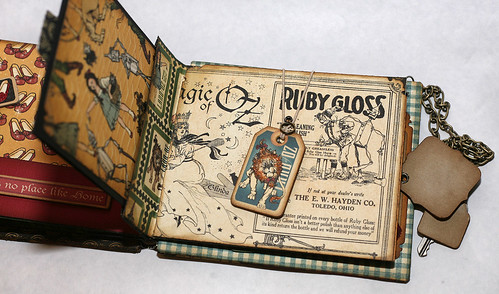
For this project I used "The Magic of Oz" line by Graphic 45. You have GOT to get down to Paper Pals to check it out. What a fabulous line! It's whimsical, fun, and nostalgic. I absolutely LOVE the coordinating chipboard tags too! I used lots of Tim Holtz charm clips. Love those little guys.

I'm not going to show you every page of this album, just my favorites. If you want to see it all in person head down to Paper Pals! Pick up some of this awesome paper and chipboard tags while you're there.

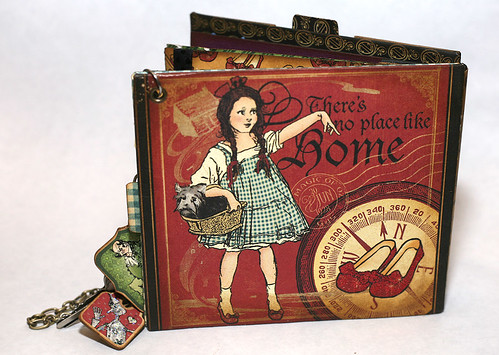
Front Cover - All I did here was cover two pieces of chipboard and glued them together on three sides to create a pocket for a tag. I also added some stickles to the Emerald City and poppies for a little punch of bling. The chain is attached by a jump ring and has a clasp on it, but I like to just slip it on and off.
OZ-01

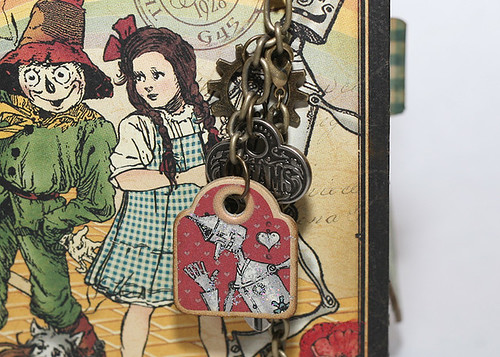
I added a Tim Holtz key and sprocket gear as well as a chipboard tag to the chain. Did I already mention that I LOVE these chipboard tags? They're nice and thick.
OZ-02

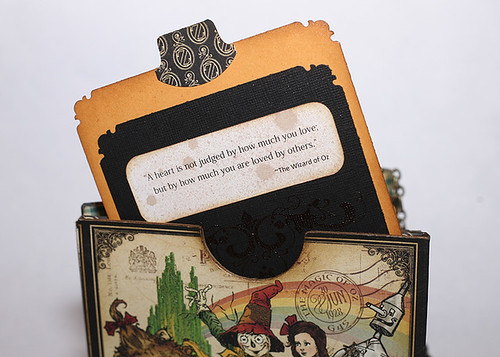
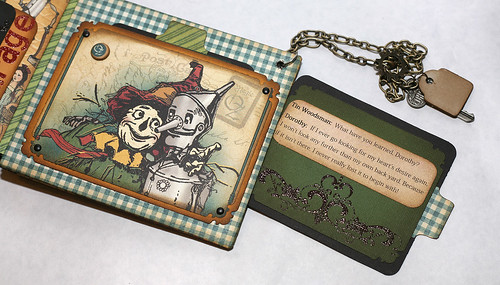
There's the tag I mentioned earlier. I printed off a few fun quotes from the movie and used them throughout the album.
OZ-04

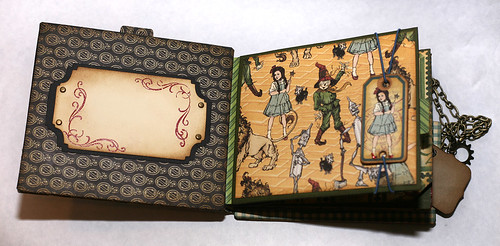
On the inside cover I added a little spot to write a personalized note to the recipient of this mini.
OZ-06

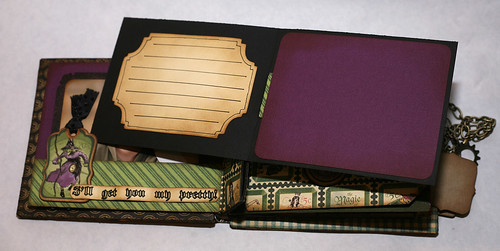
I added two folding folders inside that stick into small pockets.
OZ-07

They give you the option to add four more photos or mix it up with journaling spots.
OZ-07b

OZ-10

OZ-11

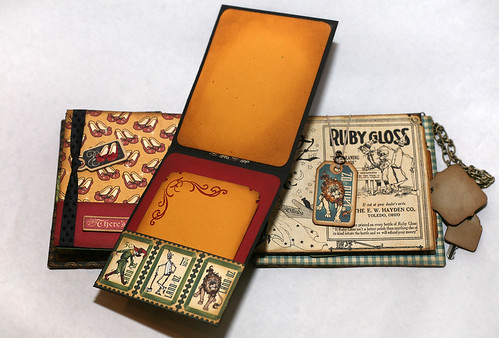
This is one of my favorite elements. I used a Tim Holtz memo pin to create this latch along with one of the chipboard tags and an elastic band. This folds out and has two pictures inside.
OZ-12

Just like with the front cover, I made a pocket for a final tag that slips into the back cover, but instead of slipping it in from the top it slips in from the side.
OZ-16

That's the end folks! This paper really was the star of this mini. I didn't feel like I had to over embellish or add much to it.
OZ-17

Before I sign off I want to tell you about a fabulous product that will be coming to Paper Pals soon; Scor-Tape. It's double-sided adhesive like the red line tape, but you can tear it. No scissors needed people, and I personally think it's stronger than the red line tape. Not to mention you get a lot more for your money. It's a must-have if you like to make mini albums. I love this stuff!

I hope you enjoyed my first design team project. I'm looking forward to creating more in the next five months!
Pin It!