I got to work with one of the fabulous new lines by My Mind's Eye; Lost & Found Christmas. This paper is gorgeous! I don't usually enjoy scrapbooking Christmas (I know, I'm crazy), but this line makes it easy and really inspired me. I have four projects to share.
The first one is this layout.
I made two types of flowers; paper flowers (good tutorial here) and embossed ribbon flowers. For the ribbon flowers I used a product called Ribbon Stiff (now being carried by Paper Pals). You paint it onto ribbon, let it dry, then you can punch your ribbon, cut it into any shape without fraying, and even use it in your die cutting machine or Cricut. I cut these out with my Cricut then used an embossing folder to emboss a polkadot design into them. *Note: I saw that Karen is offering a closs on different flowers. Check it out here.
My next project is this little matchbook type mini album. It's so simple and fun to make!
I also made two cards. This first one is a simple greeting card.
This next card was designed to hold a gift card inside.
There you have it! Now go check out the new products that have arrived at Paper Pals. You're gonna love them!
August 21, 2011
August 17, 2011
August 10, 2011
What's Up Wednesday!
Another video featuring some of my favorite new products in store! Enjoy.
Angela
Angela
August 5, 2011
New Design Team!
We've got a new design team underway at Paper Pals!
Several ladies have remained a part of the team from the last term, but we're happy to introduce to you a couple of fresh faces.
First off, we welcome Amber Anderson. She's new to our team and you can see her first project posted here. Welcome, Amber! We can't wait to see more of your projects.
We are also welcoming back Anita to the team. She took a break from the team to finish her PhD and now Dr. Cory is back to create and share with us. Welcome back, Anita!
Several ladies have remained a part of the team from the last term, but we're happy to introduce to you a couple of fresh faces.
First off, we welcome Amber Anderson. She's new to our team and you can see her first project posted here. Welcome, Amber! We can't wait to see more of your projects.
Those remaining on the team are Judy Pilcher, Leah Larson, Deb Felsted and me (Angela Lenssen). We are excited to get going on some new projects to share what Paper Pals has to offer. Come back soon for even MORE!
August 3, 2011
What's Up Wednesday....
Some of my favorite things to pull out of my scrapbooking/card making "bag of tricks" are different fonts. I LOVE FONTS!! And, I think you can really enhance a card or scrapbook layout by choosing just the right font.
I have purchased fonts from "Two Peas In A Bucket" and from "Scrap-n-fonts". But, you don't have to spend a cent to get FANTASTIC fonts....there are SO many great sites on the Internet that offer hundreds and hundreds of FREE fonts!
I want to share with you some sites that I go to frequently to download some terrific fonts...and, all for free!!
1001 Free Fonts, http://www.1001freefonts.com/
dafont.com, http://www.dafont.com/
urban fonts, http://www.urbanfonts.com/free-fonts.htm
Font Garden, http://www.fontgarden.com/gallery.php
Free scrapbooking fonts, http://www.kevinandamanda.com/fonts/freescrapbookfonts/
Scrap Village, http://www.scrapvillage.com/fonts.htm
1. Open Fonts by clicking the Start button , clicking Control Panel, clicking Appearance and Personalization, and then clicking Fonts.
2. Click File, and then click Install New Font. If you don’t see the File menu, press ALT.
3. In the Add Fonts dialog box, under Drives, click the drive where the font that you want to install is located.
4. Under Folders, double-click the folder containing the fonts that you want to add.
5. Under List of fonts, click the font that you want to add, and then click Install.
(**If the font is in a zip file, you will have to "unzip" it: Right click on the folder and choose extract feature / option. Then you are ready to begin the download procedure.).
It's just that easy!! I hope you will go out there and find and download some new fonts that you would like to try! But, let me warn you...it is addicting!! :0)
I have purchased fonts from "Two Peas In A Bucket" and from "Scrap-n-fonts". But, you don't have to spend a cent to get FANTASTIC fonts....there are SO many great sites on the Internet that offer hundreds and hundreds of FREE fonts!
I want to share with you some sites that I go to frequently to download some terrific fonts...and, all for free!!
1001 Free Fonts, http://www.1001freefonts.com/
dafont.com, http://www.dafont.com/
urban fonts, http://www.urbanfonts.com/free-fonts.htm
Font Garden, http://www.fontgarden.com/gallery.php
Free scrapbooking fonts, http://www.kevinandamanda.com/fonts/freescrapbookfonts/
Scrap Village, http://www.scrapvillage.com/fonts.htm
To INSTALL a font:
2. Click File, and then click Install New Font. If you don’t see the File menu, press ALT.
3. In the Add Fonts dialog box, under Drives, click the drive where the font that you want to install is located.
4. Under Folders, double-click the folder containing the fonts that you want to add.
5. Under List of fonts, click the font that you want to add, and then click Install.
(**If the font is in a zip file, you will have to "unzip" it: Right click on the folder and choose extract feature / option. Then you are ready to begin the download procedure.).
It's just that easy!! I hope you will go out there and find and download some new fonts that you would like to try! But, let me warn you...it is addicting!! :0)
July 31, 2011
Magic of Oz Mini Album
Hello everyone! Amber here. This is my first project as a Paper Pals design team member. I hope you all enjoy it as much as I enjoyed creating it.
For this project I used "The Magic of Oz" line by Graphic 45. You have GOT to get down to Paper Pals to check it out. What a fabulous line! It's whimsical, fun, and nostalgic. I absolutely LOVE the coordinating chipboard tags too! I used lots of Tim Holtz charm clips. Love those little guys.
I'm not going to show you every page of this album, just my favorites. If you want to see it all in person head down to Paper Pals! Pick up some of this awesome paper and chipboard tags while you're there.
Front Cover - All I did here was cover two pieces of chipboard and glued them together on three sides to create a pocket for a tag. I also added some stickles to the Emerald City and poppies for a little punch of bling. The chain is attached by a jump ring and has a clasp on it, but I like to just slip it on and off.

I added a Tim Holtz key and sprocket gear as well as a chipboard tag to the chain. Did I already mention that I LOVE these chipboard tags? They're nice and thick.

There's the tag I mentioned earlier. I printed off a few fun quotes from the movie and used them throughout the album.

On the inside cover I added a little spot to write a personalized note to the recipient of this mini.

I added two folding folders inside that stick into small pockets.

They give you the option to add four more photos or mix it up with journaling spots.


This is one of my favorite elements. I used a Tim Holtz memo pin to create this latch along with one of the chipboard tags and an elastic band. This folds out and has two pictures inside.

Just like with the front cover, I made a pocket for a final tag that slips into the back cover, but instead of slipping it in from the top it slips in from the side.

That's the end folks! This paper really was the star of this mini. I didn't feel like I had to over embellish or add much to it.

Before I sign off I want to tell you about a fabulous product that will be coming to Paper Pals soon; Scor-Tape. It's double-sided adhesive like the red line tape, but you can tear it. No scissors needed people, and I personally think it's stronger than the red line tape. Not to mention you get a lot more for your money. It's a must-have if you like to make mini albums. I love this stuff!
I hope you enjoyed my first design team project. I'm looking forward to creating more in the next five months!
For this project I used "The Magic of Oz" line by Graphic 45. You have GOT to get down to Paper Pals to check it out. What a fabulous line! It's whimsical, fun, and nostalgic. I absolutely LOVE the coordinating chipboard tags too! I used lots of Tim Holtz charm clips. Love those little guys.
I'm not going to show you every page of this album, just my favorites. If you want to see it all in person head down to Paper Pals! Pick up some of this awesome paper and chipboard tags while you're there.
Front Cover - All I did here was cover two pieces of chipboard and glued them together on three sides to create a pocket for a tag. I also added some stickles to the Emerald City and poppies for a little punch of bling. The chain is attached by a jump ring and has a clasp on it, but I like to just slip it on and off.
I added a Tim Holtz key and sprocket gear as well as a chipboard tag to the chain. Did I already mention that I LOVE these chipboard tags? They're nice and thick.
There's the tag I mentioned earlier. I printed off a few fun quotes from the movie and used them throughout the album.
On the inside cover I added a little spot to write a personalized note to the recipient of this mini.
I added two folding folders inside that stick into small pockets.
They give you the option to add four more photos or mix it up with journaling spots.
This is one of my favorite elements. I used a Tim Holtz memo pin to create this latch along with one of the chipboard tags and an elastic band. This folds out and has two pictures inside.
Just like with the front cover, I made a pocket for a final tag that slips into the back cover, but instead of slipping it in from the top it slips in from the side.
That's the end folks! This paper really was the star of this mini. I didn't feel like I had to over embellish or add much to it.
Before I sign off I want to tell you about a fabulous product that will be coming to Paper Pals soon; Scor-Tape. It's double-sided adhesive like the red line tape, but you can tear it. No scissors needed people, and I personally think it's stronger than the red line tape. Not to mention you get a lot more for your money. It's a must-have if you like to make mini albums. I love this stuff!
I hope you enjoyed my first design team project. I'm looking forward to creating more in the next five months!
July 9, 2011
Hip Hooray-- Boy by MME
Hip Hooray! A super duper birthday line that works great for boys AND girls! They created this line for boys, but I found it to work great for girls too-- especially girls who are a little older or not so fond of pink. :)
I had a lot of easy ideas come to me for the cards and I'm happy with the way they have turned out. The accessory sheet and the Bazzill pleated borders made it simple!
Layouts were fun using this line and the Technique Tuesday chipboard circles. I covered the largest circle w/ pattern papper and wrapped the smaller one with tulle. I think it has quite a unique look to it.
Then I did a layout for my daughter's birthday-- the colors from this line worked perfectly with the environment of the gymnastics party.
Lastly, I made the layout w/ my son on the bike. "The Whee! Part" was a story I wrote down a couple of years ago and have been waiting to scrap it. So glad I got it down on paper now!
I had a lot of easy ideas come to me for the cards and I'm happy with the way they have turned out. The accessory sheet and the Bazzill pleated borders made it simple!
Layouts were fun using this line and the Technique Tuesday chipboard circles. I covered the largest circle w/ pattern papper and wrapped the smaller one with tulle. I think it has quite a unique look to it.
Then I did a layout for my daughter's birthday-- the colors from this line worked perfectly with the environment of the gymnastics party.
Lastly, I made the layout w/ my son on the bike. "The Whee! Part" was a story I wrote down a couple of years ago and have been waiting to scrap it. So glad I got it down on paper now!
Go in to the store and get some "Hip Hooray" for your next birthday layouts!
June 29, 2011
What's Up Wednesday?
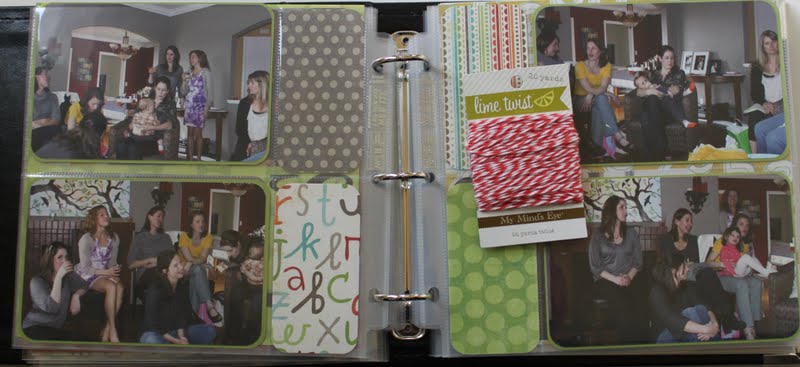
Well I made a lovely little video last night but I couldn't get it to load so instead I have a bunch of photos. My friends and I threw a baby shower for our friend, Alison. I took a ton of photos with the idea that I would make her a shower book. I got a 8x8 We R Memory Keepers Scrap Book from the store as well as all the boy themed lime twist papers from My Mind's Eye. I also added a couple sheets of My Mind's Eye fine and dandy paper. I love the way these papers go together. It totally takes the guess work out of color combos.
I had a bunch of photos so I wanted something fast and easy. I cut some photos to 4x4 and left some at 4x6. I simply mounted them on the paper and cut out some words on the Cricut. My Mind's Eye has great accessories that go so well with this paper.
I had so many photos of her opening presents so I cropped all of them down to 4x4 and slapped them down on the page.
For some pages I spent more time but once I was organized this book came together very fast. I have a few finishing touches and then I can send it off.
I got some lime twist twine that I plan on using in the book. I am thinking I will tie it around the 2x3 pattern paper that I put inside the pockets of this page protector. The book came with divided page protectors with room for 2-4x6s and 2-2x4 spots. I cut pattern paper to fit in those pockets. I also bought some full 8x8 page protectors and used a mix of both.
Sorry for the delay. Thanks for stopping in.
Our Designers LOVE Comments!
Our Design Team is so creative! One of the compliments I hear over and over again from people visiting our store is how amazing all of the samples are. Well, the majority of the in store samples are from this amazing team of scrapbookers. I know I LOVE them so if you see a post or sample that inspires YOU please feel free to leave a comment.
June 25, 2011
Bo Bunny Timepiece
Here's a Design Team layout by Leah Candler using the Bo Bunny line, Timepiece.
The combo of this product line, the Tim Holz metal key, Kaiser flowers and Technique Tuesday chipboard shapes and the adorable photo just works perfectly together!And, a couple of lovely cards with the line too...
Nice work, Leah! Thanks for your contributions to the Design Team while you were here!
June 22, 2011
Whats up Wednesday!
June 17, 2011
Paper Pals Design Team Call!
Paper Pals is excited to announce that we are searching for new members for our design team. This call is open June 20, 2011 through July 5, 2011.
So WHO are we looking for?We are looking for inspiring designers who are creative, ambitious, and love a challenge. We are looking for designers who can display the following:
~ Open communication skills
~ Unique individual style
~ Teamwork and cooperation
~ Ability to work within deadlines and under pressure
~ Skilled with technology: taking and uploading photos of projects, blogging and social networking
How do you apply?Submit the following:
1. 2 or 3 of your favorite layouts that you feel best showcase your style
2. 2 or 3 cards that you feel best showcase your style
All entries must have your name printed on the back. Submit your entries at our store June 20 through July 5 . (Remember, we are closed on Sundays).
The fine print:The design team term will run for 6 months, July 2011 through January 2012.
If you have questions please contact Karen at the store by calling
509-332-0407.
So WHO are we looking for?We are looking for inspiring designers who are creative, ambitious, and love a challenge. We are looking for designers who can display the following:
~ Open communication skills
~ Unique individual style
~ Teamwork and cooperation
~ Ability to work within deadlines and under pressure
~ Skilled with technology: taking and uploading photos of projects, blogging and social networking
How do you apply?Submit the following:
1. 2 or 3 of your favorite layouts that you feel best showcase your style
2. 2 or 3 cards that you feel best showcase your style
All entries must have your name printed on the back. Submit your entries at our store June 20 through July 5 . (Remember, we are closed on Sundays).
The fine print:The design team term will run for 6 months, July 2011 through January 2012.
If you have questions please contact Karen at the store by calling
509-332-0407.
June 15, 2011
What's Up Wednesday
It's What's Up Wedneday again! I've recorded another video to promote the new My Minds Eye products at the store... check it out!
And it's even better in person, so come on in to see for yourself!
June 4, 2011
Bella Blvd.
Another "super cute" boy line of double-sided patterned paper, this time from Bella Blvd. The collection is called "Mr. Boy" and the fun dinosaurs, stars, and stripes in primary colors make an excellent backdrop for little boy pictures! I really had fun with this paper!
The challenge for me was using the "FUNdamental Technique Tuesday" chipboard circle. (On a side note, my niece, Jamie Harper, is a designer for Technique Tuesday and she can literally "pop out" the cutest layouts using any and every thing!! Here is a cute layout she did using the FUNdamental chipboard circles.) But, I had fun with this. I stamped the circle with a pigment ink "chalk" stamp pad to give it the blue color to match the paper...I really like how it turned out.
The cutest part of the layouts are my grandsons, I never get tired of scrapbooking when I have such fun pictures to use!
The challenge for me was using the "FUNdamental Technique Tuesday" chipboard circle. (On a side note, my niece, Jamie Harper, is a designer for Technique Tuesday and she can literally "pop out" the cutest layouts using any and every thing!! Here is a cute layout she did using the FUNdamental chipboard circles.) But, I had fun with this. I stamped the circle with a pigment ink "chalk" stamp pad to give it the blue color to match the paper...I really like how it turned out.
The cutest part of the layouts are my grandsons, I never get tired of scrapbooking when I have such fun pictures to use!
June 1, 2011
Karen Foster Design
One of the reasons that I love being on the design team is that I am challenged to step out of my box. My assignment this week was to create using Karen Foster Design: Summer Sun, Wild Water & Making Waves Collage Paper as well as Splish Splash Cardstock Stickers. The collage paper is one I wouldn't normally pick because I have trouble covering it up. After looking through countless magazines I finally settled on an idea.
This paper is super fun and great for a whole bunch of water fun. I made little loops in the ribbon and then attached charms I had made out of the stickers.
I got some paper board circle shapes to play with. I covered 2 of them with cardstock and embroidered on the other.
Cards made out of the few little scraps I had left.
This paper is super fun and great for a whole bunch of water fun. I made little loops in the ribbon and then attached charms I had made out of the stickers.
I got some paper board circle shapes to play with. I covered 2 of them with cardstock and embroidered on the other.
Cards made out of the few little scraps I had left.
May 19, 2011
What's Up Wednesday
I love everything Tim Holtz..I try to keep all his stuff together. He has GREAT embellishments for scrap booking, I have also made allot of jewelry with his products.
So many different things can be done! I have added a courage charm and used a pink pearl for a breast cancer awareness necklace for my boss, who's sister is a cancer survivor.
Thanks for visiting!
Leah Candler
So many different things can be done! I have added a courage charm and used a pink pearl for a breast cancer awareness necklace for my boss, who's sister is a cancer survivor.
Thanks for visiting!
Leah Candler
May 10, 2011
What's up, Wednesday?
I love to scrapbook, but for me, the part of scrapbooking that I struggle with most is journaling. "Simple Scrapbooks" (a magazine that is no longer in print---and I miss it!) published an idea book titled "Scrapbook Shortcuts with Quizzes and Questions. 25 easy quizzes to jumpstart your journaling today, scrapbook YOU painlessly, tips and tricks for getting the story." This idea book came out a few years ago and I still pull it out on a regular basis to get ideas.
It's fun to "interview" our grandchildren about once a year and record their answers on a scrapbook layout. I am working on a layout using these questions:
Who is the smartest person in your family?
What is your Daddy really good at?
How are you different than your Mommy?
What can you do better than your Daddy?
What is one thing Mommy always says to you?
What do you and your Daddy do together that you will always remember?
How do you know that Mommy and Daddy love you?
***************************************************
You can also record the answers to the following questions every year and see how they change as the child gets older:
Favorite subject in school, best friends, favorite lunch, something new I've learned, favorite movie, the best thing about me, the most fun I've had lately, favorite song, favorite clothes to wear, last compliment I received, favorite toy, favorite TV show, favorite thing to eat.
****************************************************
Using the quizzes is also the perfect way to scrapbook about yourself. There is no greater gift for your friends and family than a glimpse of the "real" you, a "slice of your life" right now! These questions can be answered yearly for a personal year-end inventory:
The last person I sent a card to
What I ate for lunch today
Something I just learned
My favorite song this year
The last book I read
What I'm wearing right now
The last phone call I made
Inside, I don't feel very different from when I was
The last restaurant I ate at was
My favorite TV show
The last movie I saw
************************************************
You can capture someone by just doing journaling blocks of their "favorites."
One last idea is a "fill in the blanks" approach to journaling. These idea also comes from the book:
*If I hadn't become a _____, I might have been a _____.
*If I hadn't gone to _____, I might have never met _____.
*If I hadn't learned to ____, I would never have gotten to _____.
*My _____ is my most prized possession.
*My ability to _____ is one of my greatest skills.
*If asked, my family will say my greatest accomplishment is _____.
*I'm sorry I will never see _____ again.
*Going to _____ taught me that _____.
*My life would be easier if I got my _____ fixed.
*I would be happy if I never saw another _____ again.
I could go on and on, but I think this gives you an idea of the fun you can have will this approach to journaling!!
Subscribe to:
Posts (Atom)