Showing posts with label Leah. Show all posts

March 7, 2012

s.e.i. promise me

Layout and Cards
Ingredients:  s.e.i. promise me: passion, happiness, delicacy, sweet talk and adoration papers, promise me sundries and promise me accent frames, Tattered Angels Glimmer Mist-Silver, cream and red embroidery floss, Glossy Accents, fake diamond embellishment, ribbon stamp, Bazzill paper in various colors...

The layout was a scrap lift from Creating Keepsakes Nov/Dec 2011 issue, page 81.  I cut the paper into strips of 1/2 inch and glued them down.  I cut out the gold fancy circle from the delicacy paper. After gluing down all the strips and circle I then made a circle to fit inside the circle to use as a mask.  I then sprayed the whole thing with my glimmer mist.  I used a lot of spray so the paper curled a bit when it dried.   Then I added my embellishments, photo and ribbon stamp. I did a bit of embroidery stitching on the journal strip and in random spots.  Then I added some Glossy Accents to the word "LOVE".
The sweet talk paper had a lot of cute sayings and journaling squares that I used on 2 of the cards.  For the other cards I used some of my scrap paper and goodies from the accent frames and sundries packages.  I especially love that little key. 
This would be a perfect line for wedding, valentines or anything related to love. 
Pin It!

August 22, 2011

My Mind's Eye- 12 days of Christmas

 I love Christmas so I was very excited to work with this fun cheerful paper.  It is My Mind's Eye 12 days of Christmas: Tinsel, Joy and It's the Season pattern paper along with the accessory sheet and 12 days of Christmas trim.  I love the trim with the little fuzzy pom poms.  I also used up a bunch of baker's twine. 
 I did a lot of punching and pasting on this page.  For the ribbon I ran it through the sewing machine on a basting stitch and then bunched it up and tacked it down with glue strips. 
There are so many accessories on the sheet that you could make at least 12 cards.  It was so hard to choose.  I wanted to use them all.  I added some pearl dots in silver to the tree. 
Pin It!

June 29, 2011

What's Up Wednesday?

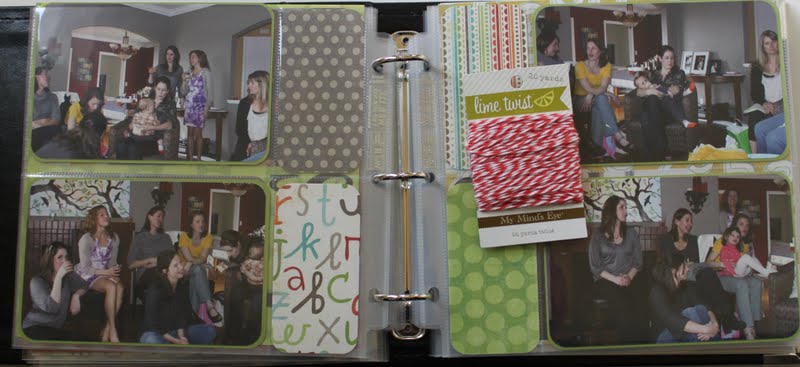
Well I made a lovely little video last night but I couldn't get it to load so instead I have a bunch of photos.  My friends and I threw a baby shower for our friend, Alison.  I took a ton of photos with the idea that I would make her a shower book.  I got a 8x8 We R Memory Keepers Scrap Book from the store as well as all the boy themed lime twist papers from My Mind's Eye.  I also added a couple sheets of My Mind's Eye fine and dandy paper.  I love the way these papers go together.  It totally takes the guess work out of color combos.
I had a bunch of photos so I wanted something fast and easy.  I cut some photos to 4x4 and left some at 4x6.  I simply mounted them on the paper and cut out some words on the Cricut.  My Mind's Eye has great accessories that go so well with this paper.  

I had so many photos of her opening presents so I cropped all of them down to 4x4 and slapped them down on the page.
For some pages I spent more time but once I was organized this book came together very fast.  I have a few finishing touches and then I can send it off. 
I got some lime twist twine that I plan on using in the book.  I am thinking I will tie it around the 2x3 pattern paper that I put inside the pockets of this page protector.  The book came with divided page protectors with room for 2-4x6s and 2-2x4 spots.  I cut pattern paper to fit in those pockets.  I also bought some full 8x8 page protectors and used a mix of both. 
Sorry for the delay.  Thanks for stopping in. 
Pin It!

April 27, 2011

What's Up, Wednesday?


Hi.  It is Leah Larson.  I get to fill you in on what is going on in my world.  Have you ever been asked "How often do you scrapbook?"  Well I would love to be able to scrap every day but we all live in the real world.   I do get to check in on some of my favorite blogs daily.
Ali Edwards, Becky Higgins and Cathy Zielske"s are the 3 blogs that I check on a daily basis.  I especially love Ali's blog and enjoy reading about her life and her projects.  I also check in on a regular basis at Blue Cricket Design.  I like when they have a show and tell linking party were you can check out what people on other blogs are doing.  There are a lot of talented people out there.  I am thankful for that because it gives me an endless supply of inspiration.  Check out the blog little things bring smiles.  I am thinking that these canvases can also be done with letters cut out on the Cricut.  I love the bright colors.  I am thinking of making them for my craft room.  Perhaps with words like:  create, cut, paste, crop, sew....  So much to do so little time.  Thanks for stopping in to my world.
Pin It!

March 24, 2011

Bazzill Basics Paper-Grandma's Feather Bed

I love the bright colors of this paper.  It is nice thick good quality paper.  The stickers on the sticker sheet were super cute.  They were perfect for photos of the family.  The fork, knife and spoon were cut out on the Cricut and then I covered them with some silver pearl.  Thank you Shawna.  You can't tell in the photo but on the top pattern paper I covered the dots with brads.  I also covered the "my family" sticker with glossy accents because I love that stuff.
I love the way this page turned out.  I like to have a mix of pattern paper.  Especially when the pattern paper is so cute that I can't decide which one to use.  I actually cut the circles in the paper then placed the pattern paper behind the circles.  I then sewed them in place.  I painted the chipboard flowers then covered them in 2 coats of clear embossing powder.  The "together" and "2010" were cut out on the Cricut and then covered in glossy accents.  I embroidered around the stickers. 
The colors of the paper are so bright.  The patterned papers are called Art Deco,Chocolate Drops, Deco Daisy, Lazy Daisy, Grandma's Damask & Bold Stripe.  It makes for some real cheerful cards.
Pin It!

February 26, 2011

GOOD DAY Sunshine-My Mind's Eye

 I really like the name of this line and of course the colors and the cuteness.  I used the Sunny Stripes, Up Town, Out and About, Daytime Digits & Cityscape Paper.  I also used the Good Day Sunshine Girls Accessory Sheet.  I did a loose hand stitch down the length of the ribbon then gathered it up and glued it down.  I put some Glossy Accents on the "Love".  I embroidered around a few circles and the letter "A".  I added some buttons and that is about it.  It would have been a fast page with out the embroidery. 
 I just had to use this paper with the bridge.  I cut out a couple clouds and popped them up.  I put some Glossy Accents on some windows and on the circle embellishments and the number 5.  I embroidered around the block.  The buttons came on the accessory sheet. 
Some fast cards.  The accessory sheet had a bunch of cute cut outs like the scooter and the boat. 
Pin It!

January 11, 2011

Meet Design Team Member, Leah Larson!

Here she is: Leah Larson, Paper Pals Design Team Member!
Leah is a returning member to the Design Team. She's great at incorporating sewing into her projects and has the kind of handwriting that should be made into a font. No journaling disasters for this gal!

Leah is originally from Canada. She has now been in the states for over 15 years, but she's managed to hold on to her accent. :) Leah formally worked as a Labor and Delivery nurse in Seattle. "We moved from Bellevue, WA to Pullman 4 years ago. After my daughter was born I really didn’t want to go back to work and leave her in someone else's care, so my husband and I decided to move to Pullman where my stepsons live."

Leah has been scrapbooking for 10 years now.  She says, "The more I do it the more I love it. I am sure I will be a scrapbooker for the rest of my life." There are many things that inspire Leah when it comes to papercrafting. "I love the stories and the photos. Not to mention the paper, stickers, embellishments, stamps… I am driven to record the everyday things that happen to us. It would be wonderful to see all these kind of details about my Grandmother’s life. Just a simple photo of what was in her cupboards would be fascinating to me."

When it comes to the pros, Ali Edwards is a “life artist” that she truly admires. She loves her clean and artistic style and the fun projects to share.  She also regularly keeps tabs on  Becky Higgins’ blog. Leah is currently doing Becky's "Project Life" and she is "totally in love. This is the first time since starting scrapbooking were I have been caught up on the current year."

One of Leah's favorite product lines is Cosmo Cricket-- available at Paper Pals! She's drawn to the manufacturer's cute designs.


One recent project she has worked on was for her daughter's birthday. Isn't that robot just the cutest? And what a unique idea for a little girl's birthday!
You can see more of Leah's work and keep up with her creative scrappiness at her personal blog, Confessions of a Scraplifter.
Leah had a hard time picking just one thing that she loves most about Paper Pals. "There are so many things that I love. Karen and Shawna make the store what it is. They greet you when you walk in. How nice is that? It is truly a treat to go in there. I love looking at all the wonderful products and dreaming. You could look in there all day and still see new stuff. The smell in there is so delicious. It even comes home on the paper you buy. The products they sell are good quality. I just can’t say enough. "
 
Go visit the store yourself to experience what Leah loves!
 
And come back here next week to meet Design Team Member, Judy!
Pin It!

January 9, 2011

My Mind's Eye-Fine and Dandy

My latest project was with the My Mind's Eye-fine and dandy line.  I got to work with the True Blue paper,stickers and banner stickers.  I love the colors.  My favorite was the orange honey comb paper on this card.  The banner stickers are perfect for creating banners, stars or flowers.  I especially liked the letter stickers.

 I just love those little owls.  So adorable.

 I have wanted to try a layout with a banner and it was easy.  I did embroider the tops of the banner stickers only because I knew my sewing machine would get gummed up with the stickers. 
This kind of paper is so easy to create a layout on.  Basically you just add your photos and it is done.  I made openings in the paper and placed my photos behind.  The two owls are already on the paper but I wanted them to pop so I added the owl stickers from the True Blue Layered Stickers.  I embroidered around the clouds and stitched around the photos.
Pin It!

January 9, 2010

Basic Grey-Sugar Rush

I got to work with the Basic Grey Sugar Rush line. The sticker sheet is packed with stickers. I had a lot of leftover stickers when I was done. The paper made me think of Valentine's day and of course my daughter. Here are the cards.

I very rarely do 12x12 pages with one photo but this was one of my favorite photos and I wanted to show off more of this paper. I used blue,white, green and red card stock. The letters were cut out on the Cricut with the alphalicious cartridge. I used some red brads from Paper Pals and I covered some card stock with clear bubble stickers. The rest of the supplies are from the Basic Grey sugar rush line. I used white card stock and a strip of green card stock. I used a piece of red ribbon and the same brads as the above layout. The rest is from the Basic Grey sugar rush line. I was oohing and ahhing over the paper and stickers. I could have done a sticker sneeze since I really wanted to use every single sticker on the sheet. I had to operate a bit of control there. When you cut the strip off the bottom of the paper, that has the paper name on it, on the back is patterned paper. So I used that strip as one of my strips to look like ribbon.
Pin It!

January 8, 2010

In the tub

I actually hadn't even thought of a layout when I posted the challenge. This is a scrap lift but now I can't find the magazine I lifted it from. I will post it when I find it. I just got my scrap drawer out, my black pen, my scissors, glue, embroidery floss and of course my pictures. It was hard for me not to get out the old circle cutter to make my circles perfect. In the end I like the way it turned out. I plan on doing the right side but I am working on my Basic Grey project right now. He He.
Pin It!

January 6, 2010

Here is my challenge

I have been thinking of this one for a while. My challenge for the design team is to create a layout, card or other using your leftover scraps of card stock or pattern paper, white card stock, your scissors, glue, pen (your choice of color) and one other embellishment or tool of your choice. Create something using these 5 ingredients. I guess it would be 6 ingredients if you count the pictures. Now I need to get busy creating. Have fun.
Pin It!

December 11, 2009

And now for the cards

I made the cards using my scraps from the Life Stories line from My Mind's Eye. On the "thinking of you card" I tried some folding and then stapled the folds and weaved a skinny strip of paper through the staples. The flower is just circles that I folded in half then in half then in half till I couldn't fold anymore. Then I put a brad in the middle to hold the four layers together.
Pin It!

My Mind's Eye-Life Stories-Page Two

This was a simple page. I stitched on my photos before adhering them. It gives the edges of the photo a raised look when you glue them down. The center of the page is actually an idea I got from the Oct 2009 issue of scrapbooks etc. pg. 24. I cut out the circle in the middle of the page and then backed it with red paper that I attached with adhesive foam. I tried to make the Merry Christmas circle look like an ornament. It doesn't really show well in the photo. The paper and punch outs are from the Life Stories line from My Mind's Eye.
Pin It!

December 10, 2009

My Mind's Eye-Life Stories

This paper is called "Description of Activity". I don't know if it is just the season but the paper made me think of Christmas. The words written on the side made me think of a vacation. So that is what I did. I also got a sheet of punch outs that would work great to journal with. I really like the look of this paper and it is so thick. I stitched on my photos before adhering them. I liked the journalling prompts on the right side. It made telling the story easy.
Pin It!

December 8, 2009

These are my final two pages from the 2 pieces of pattern paper and two pieces of card stock. The 12x2 strip on the left hand side does not stay in the pocket very well so when I scrap the other side of the photo sleeve I am going to adhere them to the sleeve with a staple or eyelet.
The sleeve on the top were I placed the title is actually about 12 1/4 inches long. Since I was running out of paper I used my scraps of blue to extend it a bit.
Pin It!

December 3, 2009

More to add

I did two more pages with the amazing We R Memory Keepers photo sleeves. So far I have made 5 pages with 2 pieces of pattern paper and 2 pieces of card stock. I have enough supplies left over to make one maybe two more pages. Plus the pattern paper from Making Memories (Flower Patch) is double sided so when you slip it into the photo sleeve you can see the back of the paper. How thrifty is that? My pages are not jaw droppingly creative but they are fast and easy. I have taken a huge bite out of the stack of summer 08 pictures I had. I am feeling happy about that.
Pin It!

December 1, 2009

Easy Photo Sleeves

I am planning on using the photo sleeves from We R Memory Keepers for all my Summer 2008 Vacation photos. I have so many photos and these divided photo sleeves make it super fast and easy. There is not a lot going on in this page but I just wanted to show how super easy they are. I used the left over Making Memories flower patch paper I had from the original challenge.
Pin It!

November 14, 2009

FOR THIS I AM THANKFUL

I was going to write a whole list of things that I am thankful for but when I looked at the pictures I had on the page I decided that I would just have it be about family. It is hard to see the details but the circles on the pictures all say family. I covered them with my favorite clear bubble stickers. I did shadow letters on the Cricut in the same color card stock but on the top layer I stamped random swirly stamps to try and match the paper. All of the papers I used I have had for a very long time and always thought they were so pretty. Thanks for the challenge Angela.
Pin It!

October 14, 2009

Themed paper challenge

My little cottage cheese monster page using Halloween paper and stickers for my daughter's first time feeding herself.

Thank you Anita for the challenge. It took me a while to think of something. I kept on trying to do something with Christmas then I thought about Halloween. I had actually bought this paper from Paper Pals last year and hadn't yet used it. I did some embroidering stitching for the spider web.
I have a challenge that I have been thinking of but I am going to wait a bit till I post it. He He.

Pin It!

October 7, 2009

Creative Imaginations Line

It is so exciting to get the call from Shawna telling me to come pick up my goodies. I had almost bought this paper for a baby book I am working on. It is so adorable. I was not too sure what I was going to do with the box. Then I started thinking about gable roofs. That is when I came up with the house idea. Originally I was going to make a little doll house and some paper dolls and outfits. My daughter is almost 3 so I don't think she would be into it yet. She likes her baby dolls to be naked. Then I thought of the idea for a keepsake baby box and still keep the house idea. It was like I was a little girl again. I had a lot of fun building my house. I embossed my windows with some clear embossing on blue paper. I scored the paper for the house front every 1/2 inch. The roof is alternating pinking edge and straight edge. I painted the handles baby pink and then decoupaged the whole box when I was done. I also cut a 5x8 piece of paper board to go in the bottom of the box to make it sit better. I did not like the way the top closed so I attached two magnets and a bit of ribbon to help pull the magnets apart.


This is a scrap lift from a July 2009 issue of Scrapbooks etc. pg. 24. I did some stitching on my page which was fun. I like the quilt look of this page.

Another scrap lift which didn't really end up looking that much like the original. This one was from a Creating Keepsakes July 2008 magazine pg. 99. This is the kind of paper that is so cute you don't want to cover any of it up. I find that when I am given these kits to create with I become more creative. When I scrap with the paper I have at home sometimes I will not use it because I don't want to cut it up or don't know what to do with it even though I really like it. Then I end up saving things thinking I will use it one day. Therefore I have a bunch of paper that I love and don't use. So thank you Shawna and Karen for challenging me. It has really pushed me to be more creative.
Pin It!